Unity UI Blur In HDRP
Last Updated: November 4, 2021. I won't be updating this blog post anymore as I may be switching my projects to a different game engine.
I’ve spent a lot of time trying to get panel blur working in the Unity UI system for the High Definition Render Pipeline (HDRP). After a lot of trial and error, docs reading, and finding bits of information here and there on the internet, I’ve found five different methods that work, each with their advantages and disadvantages. This blog post puts whatever I’ve learned into one place so that other devs don’t have to go through what I did.
What This Is Not
This is not about Unity’s new UI Toolkit for runtime. As of the date of this blog post, the runtime UI Toolkit has yet to allow custom UI shaders, and is still in preview. This is also not about the older IMGUI system. This post pertains to techniques using the component and canvas-based Unity UI system, also called uGUI at one time.
The Methods
There are 5 methods I’ve found (so far) on how to do a Unity UI panel blur in HDRP. I’ll describe them briefly here, then dedicate entire sections with instructions for each.
Update: I added a 6th method below as I just found out about it. Since I haven’t tested it out, there is no dedicated instructions for it here. I’m listing it just to make others aware of it.
- Use another camera to output to a render texture, and use that render texture in a custom blur shader attached to an Image component. This one works in both screen space modes, but can have a huge performance cost.
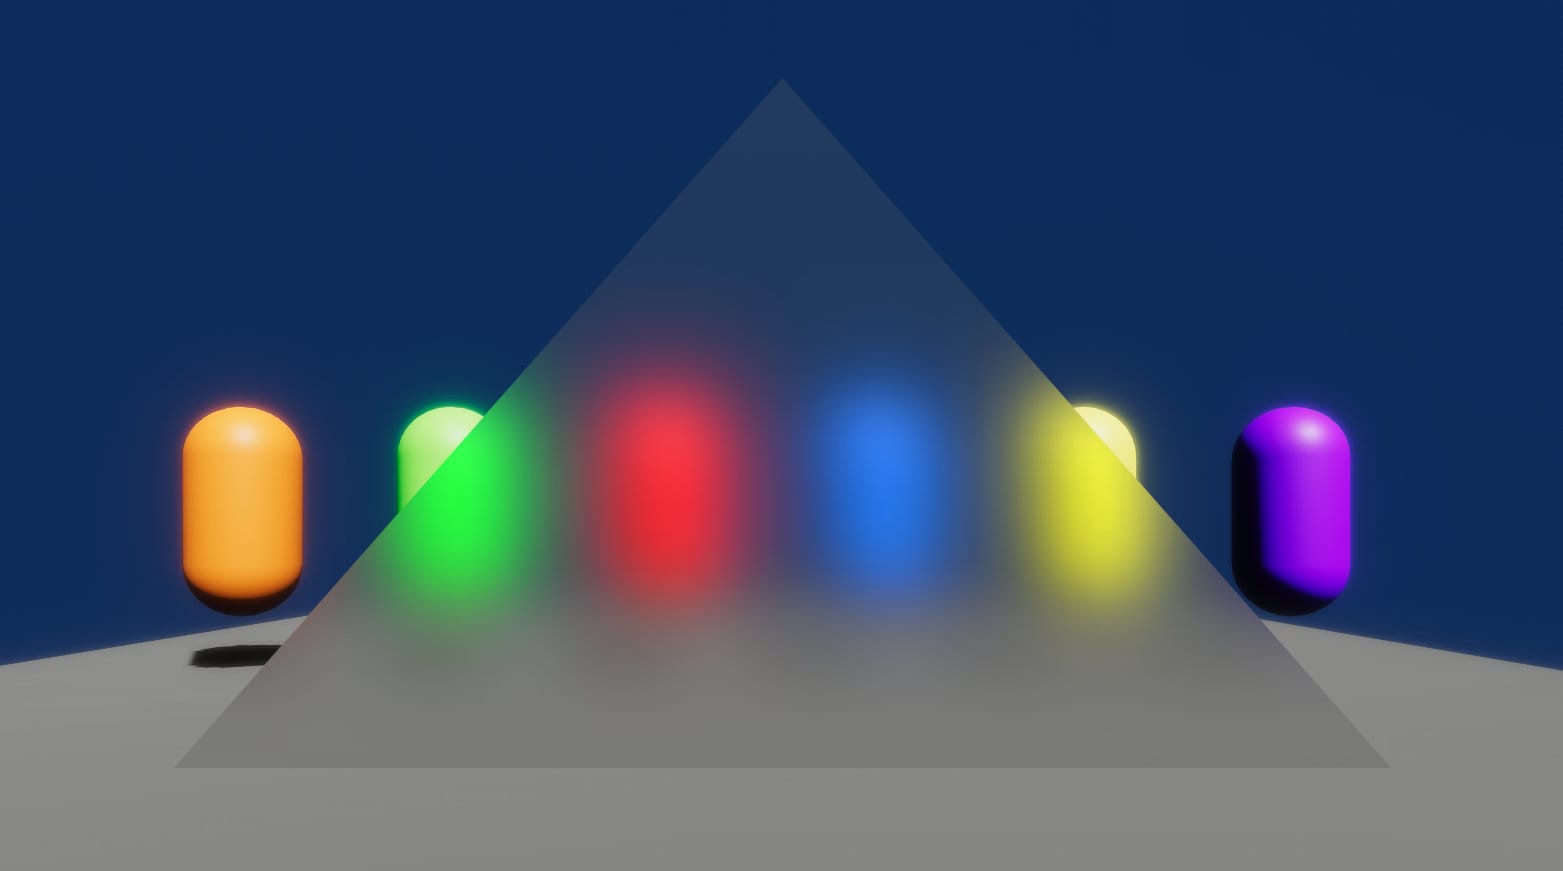
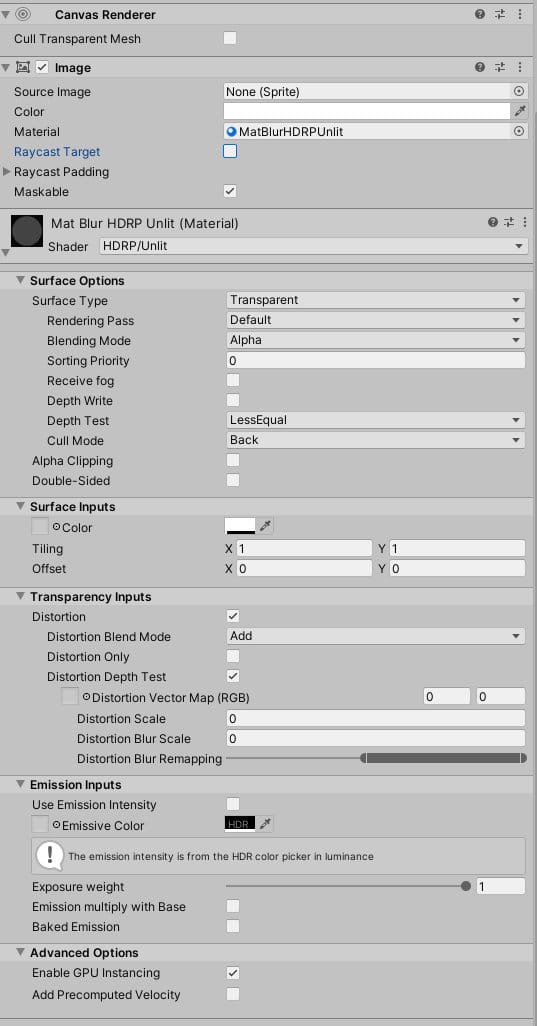
- Use HDRP’s included Unlit shader with distortion enabled, on an Image component. This one does not work in Screen Space - Overlay, won’t work in a Custom Pass, will work in the Graphics Compositor, but currently renders UI elements behind the blur. Performance cost is minimal.
- Use Shader Graph to create an HDRP Unlit shader that uses the LOD property on the HD Scene Color node for blur, in combination with one or more Custom Passes. This one does not work in Screen Space - Overlay, and leads to the before-post-processed scene color being blurred in order to prevent the UI being affected by post-processing. Performance cost is minimal.
- Use Method 3 but with the Graphics Compositor instead of Custom Passes. This one works in Screen Space - Camera mode, solves the problems with method #3, but has a high performance cost.
- Use a Custom Pass Gaussian Blur which is output to a render texture, and use the render texture on an Unlit Shader Graph material. This method works in Screen Space - Camera mode, can potentially have much better performance than method 4 (depending on settings), but has some issues when resizing the screen that I’m not able to resolve.
- New! Unity HDRP devs have linked to the following GitHub repository for an example of HDRP UI Camera Stacking: https://github.com/alelievr/HDRP-UI-Camera-Stacking
Perhaps it could be used in combination with one of the above methods for UI blur, but I haven’t tried it out yet. If I do, I’ll update this blog post.
Method 1: Render Texture
When I was using the soon-to-be legacy built-in pipeline, I purchased this asset which allowed me to have UI panel blur (which also blurred other panels behind it) using GrabPass functionality. In the new Scriptable Rendering Pipelines (SRP) in Unity, GrabPass is no longer possible, presumably because there is a high performance cost to it. When converting my project to use HDRP, I saw that the same developer created a GaussianBlur_HDRP asset. I purchased that also, and found that it does what it says. It works by using another camera to render a texture, and then using that texture in a custom blur shader on a UI component.
This asset works in both Screen Space - Camera and Screen Space - Overlay rendering modes. Of the three methods I’ve found, this is the only one that works in “Screen Space - Overlay” currently. For world space UI, this technique isn’t required (and I couldn’t get it to work with limited attempts), as we can use one of the other methods described later.
The big issue for me, though, is that there is a very high performance cost to this render technique with multiple blurred panels or a very large panel. I found that in comparison to the other methods, there was anywhere from a 3 to 4ms higher cost per frame to this method on the CPU and GPU in an actual build at 2560x1440. This is not the fault of the asset, but rather because HDRP currently isn’t efficient when rendering multiple cameras (as confirmed by the asset developer), and you need a second camera to output to a render texture. There have been questions about render texture performance in HDRP on the Unity forums. The HDRP devs included Custom Pass functionality as well as the new Compositor feature as alternate solutions to the old way of working.
Also, at lower iterations, the blur looks fine, but if going for extreme blurring, higher iterations introduce rectangular artifacts in the blur. The developer pointed out that by increasing the grid sample size in the shader, you can achieve smoother blur, but at a heavy performance penalty. I did find both of those statements to be true in my testing.
If you want UI panel blur for “Screen Space - Overlay”, this is the only easy solution I’ve found so far, but there will be a performance cost to it. For “Screen Space - Camera” UI rendering mode, I’d recommend one of the other methods below (which can almost act like Overlay mode, as we’ll see).
Method 2: HDRP Unlit Shader With Distortion Blur
* In case you’re having problems with this method, ensure Rough Refraction is enabled in your frame settings on older versions of HDRP. In newer versions, I believe it’s called Rough Distortion. Also, ensure that Distortion is enabled in the HDRenderPipelineAsset and ensure that Lens Distortion is enabled in the Camera’s Frame Settings.
This method uses the HDRP > Unlit shader on an Image component in the UI, as the caption says. I found it in this thread on the Unity forums. The Unlit shader must be set to Transparent. It also works as a material on a simple quad or any object in the world, not just in the UI, if the rendering pass is set to Before Refraction or Default. While the HDRP > Lit shader works on objects in the world (the Lit shader must be set to Transparent, and under Transparency Inputs, you need to set the Refraction Model to something other than None) , I couldn’t get the Lit shader to work in the UI.
I could not get the HDRP Unlit shader to work in Screen Space - Overlay, but it works in Screen Space - Camera and World Space UI rendering modes. The event/render camera for the Canvas must be set to your main camera, and the layer of the UI must be set in the Camera component’s Culling Mask.
While you can change the Image component’s Color property to change the color of the panel, the alpha value doesn’t do anything. However, in the Unlit shader, you can change the Color property and it’s alpha to make the image transparent.
You must also set the material’s Rendering Pass to either Before Refraction or Default. It will not work in Low Resolution or After Post-Process. Distortion must be enabled, Distortion Blend Mode can be Add or Replace, and you can use the Distortion Blur Remapping property’s left handle to set the amount of blur.
Here’s a screenshot of the material inspector, but note that not all of the settings must be like this (play around with them to see what you can change without breaking the blur effect):
The HDRP Unlit distortion also works on blurring transparent objects in the scene, in addition to opaque objects. If put on a Screen Space Camera canvas, it can blur the post-processed image.
While this method also works great on 3d objects like quads and such, in a UI, there are some problems:
First, because it works in Screen Space - Camera mode and not Overlay, post processing effects like bloom WILL affect the UI, meaning any text or icons may glow. You’ll also get blurring from depth-of-field effects or temporal anti-aliasing. In HDRP, multiple stacked cameras, one for the world and one for the UI, don’t alleviate the problem of post process affecting the UI.
In addition to this problem, any text that should be on top of the blur panel actually gets rendered behind it. One way to solve it would be to render your blur panels in Screen Space - Camera mode, and the rest of your UI that should exist on top of the panels would be in a Screen Space - Overlay canvas (Text on Screen Space - Camera canvases, even if closer to the camera than the canvas containing blur, still render text behind the blur). What a headache that would be to maintain with two different canvas spaces though, in terms of layout, code, and animations, but at least it solves the problem. Another solution could be to display the UI in a Custom Pass…
However, If you remove the UI from the camera’s culling mask, and try to use the UI in a custom pass, the blur won’t work. I tried many combinations of the Rendering Pass on the material and the Queue on the Custom Pass, but I just couldn’t get it to work correctly. Sometimes it would display blurred, but upside down. If anyone reading this has found a solution to get this particular method to work, please share in the comments.
Another solution which doesn’t allow the UI to be affected by post-processing, but still has UI elements appearing behind the blur, is using the Graphics Compositor. For this to work, we’ll need to use Screen Space Camera for the UI, remove the UI layer from the main camera, then create a second camera with the culling mask set for the UI. Open the Compositor window, enable it, and add another camera Sub-Layer after the one with the main camera, and set the UI camera to it. See the screenshot on Method 4 for how to set up the Compositor like this.
Text appearing behind the blur can most likely be fixed once the Text Mesh Pro shaders for the UI are released and we can use the render queue for After Post-Process. However, that won’t solve the problem of graphic UI elements appearing behind the blur, unless Shader Graph introduces UI shaders that can do masking and be After Post-Process as well.
So while this method is more efficient and has it’s use cases (especially in world UI), it has its share of problems that cannot be resolved yet.
Edit 3/29/2023: A comment below from Extreme Cheddar shows an additional problem and solution: Using Screen Space - Camera in Method 2 makes the UI Elements clip into world objects. This can be avoided if the Depth Test is disabled on the material. That allows you to set a much larger plane distance in the canvas, which also resolves the problem with depth of field. Just set the plane distance to the value of your focus distance and there will be no blur. That way you can have tone mapping applied to the UI and it still remains sharp.
Method 3: Shader Graph HDRP Unlit Shader and Custom Pass
* In case you’re having problems with this method, ensure Refraction is enabled in the frame settings for your camera on HDRP version 8. For newer versions of HDRP (9+), ensure Distortion and Rough Distortion are enabled in the frame settings for the camera, otherwise blur won’t work on transparent objects. Enable the Custom Pass setting on both the HDRenderPipelineAsset as well as the Frame Settings for the camera as well.
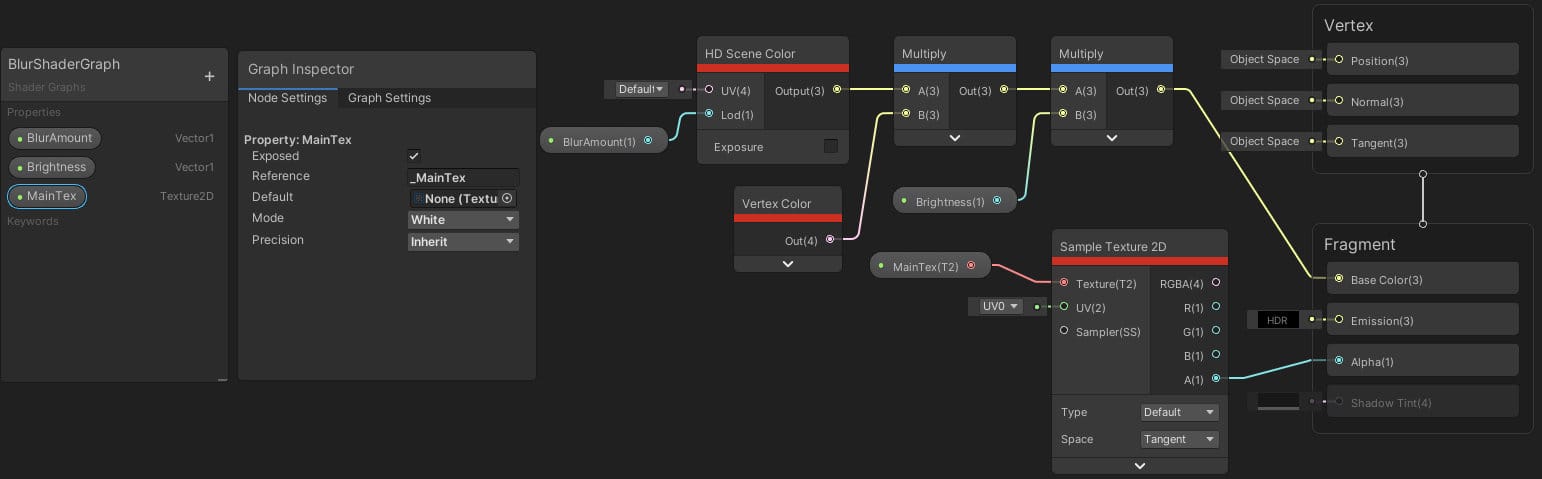
This method uses a technique found on this post on the Unity forums. This is a simple shader which uses the “Lod” property of the HD Scene Color node to blur the screen texture. I modified that shader to be affected by the Image component’s vertex color as well as added a brightness slider. Here’s the modified HDRP Unlit shader:
You can create this graph using either the regular Unlit Shader Graph, or the HDRP Unlit Shader Graph. This method works on world and UI objects. Keep in mind that this blur is lower resolution in comparison to the Distortion in Method 2, but at least we get some kind of blurring.
For world objects, this method works as a material on an object (like a quad) in the world with being set to Transparent, and Rendering Pass set to Default, Low Resolution, or After Post-Process. It also works on Word Space UI.
For UI, use that shader in a material which is assigned to the Image component on a canvas set to Screen Space - Camera. Enable the layer for this UI in your Main Camera’s culling mask. The material must be set to Transparent, and the Rendering Pass should be set to Before Refraction or Default. Blending mode works great when set to Alpha. Make sure the Camera’s Culling Mask includes the layer which the UI is in.
I couldn’t get it to work in Overlay mode, but enabling “Double-Sided” while disabling “Depth Test” makes the blur appear upside down across the whole screen at least in Overlay mode, for whatever that’s worth. After playing with it some more, I couldn’t even get that to happen again.
Depending on your exposure settings, if the blur panel is showing very bright, you may need to check the Exposure box on the HD Scene Color node in the Shader Graph and save the graph.
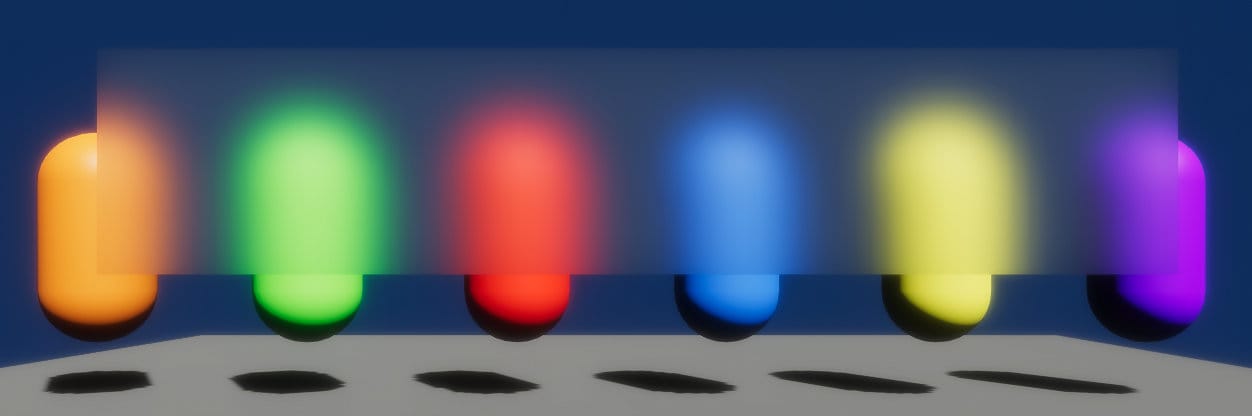
BlurAmount can be a slider from 0-9 and Brightness can be a slider from 0-10. For UI shaders, you must add a property (named whatever) but whose Reference field is set to _MainTex. That property can have the Exposed property enabled. If that property is not there, you’ll get warnings and errors in the console. If you’d like to get a shape to mask the blur, you have a few options. First, as shown above, you can try using the MainTex property into a SampleTexture2D node, and output the alpha of that node into the Alpha input in the Fragment stage. Then add a transparent UI sprite to the Source Image field of the Image component. You can also connect any sort of procedural shape node to the Alpha input to get the panel to appear in that shape (like the triangles in some of my screenshots), or you can use custom shapes for the Image component mesh from the Unity UI Extensions project.
With this Shader Graph HD Scene Color node method, you won’t get the UI components sorting problem (text that should be appearing in front actually being behind the blur) like in Method 2, but you will have other problems.
Problem 1: The UI will be affected by post processing effects, due to being in Screen Space Camera.
Problem 2: This method will not blur transparent 3D objects behind the blur panel, only opaque objects. This is because the HD Scene Color node presumably gets the screen color data before the transparent rendering pass.
Both problems 1 and 2 can be solved using a Custom pass, which you can find out more about further in this section. However, and I didn’t find this out until I tried this in my game, using a Custom Pass with this shader will NOT blur the final post processed image. If you are not using post processing, the Custom Pass method works well, but if you do, then you will have the problem of seeing a blurred image that is a different color than the unblurred part of the screen, depending on your post processing settings. If you darken the blur, then this may not be too much of a visual problem, but if using ACES tonemapping, you won’t see brightly emissive objects being desaturated behind the blur. I thought this problem could be resolved by setting the material to After Post-Process, or by changing the Queue in the Custom Pass, but I had no luck.
Using this Shader Graph method in combination with Method 4 solves this particular problem, but at a higher performance cost. If blurring the final post processed scene color is what you want, skip to method 4. If you want to solve the problems of the UI being affected by post process and transparent objects not being blurred, and are OK with blurring the before post-processed scene color, continue reading about how to setup the custom pass.
Custom Pass
To do this, you must remove the UI layer from the camera’s culling mask, and then create a Custom Pass Volume whose Mode is Global and whose Injection Point is set to After Post Process, on a GameObject whose layer is set to one that is included in the camera’s Volume Layer Mask. Then create a DrawRenderersCustomPass in the Custom Pass Volume that looks something like:
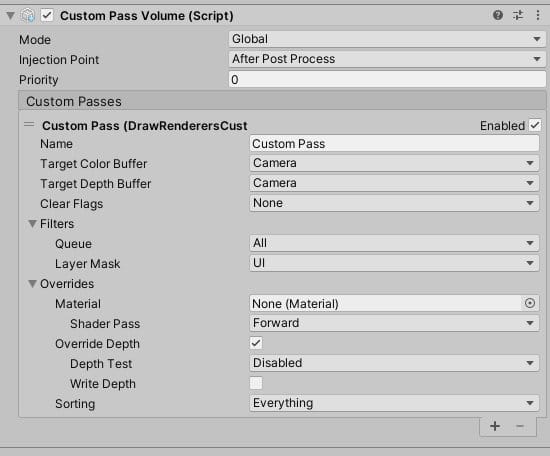
Note that you can also set the Custom Pass Queue to Transparent, All Transparent, or All. If choosing other Rendering Pass settings on the material, you may need to play with the Queue on the Custom Pass to get things to show correctly. You can also play with the other settings to see what breaks the blur and what doesn’t.
One problem with Screen Space - Camera is that you may get objects appearing in front of the UI if the Plane Distance of the UI Canvas is greater than the camera’s near clip plane, even if you put the UI plane distance as close as possible to the near clip plane. Enabling the Override Depth in the Custom Pass seems to solve this issue, essentially overlaying the UI on top of all objects, regardless of UI plane distance. So in a way, it acts like an Overlay canvas.
Another problem is that if we use Temporal Anti-Aliasing on the camera, we may get some jittering of blurred transparent objects. I wasn’t able to alleviate this much other than increasing the blur (which doesn’t remove the jitter completely), so if anyone has any ideas about this, please let me know. We can use FXAA or SMAA without the jittering problem.
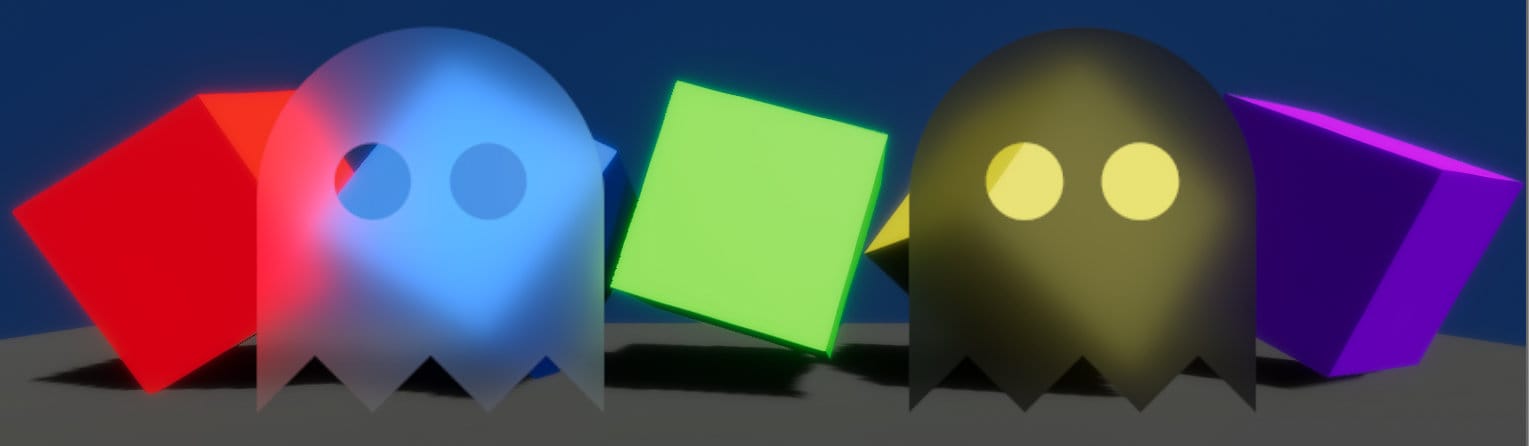
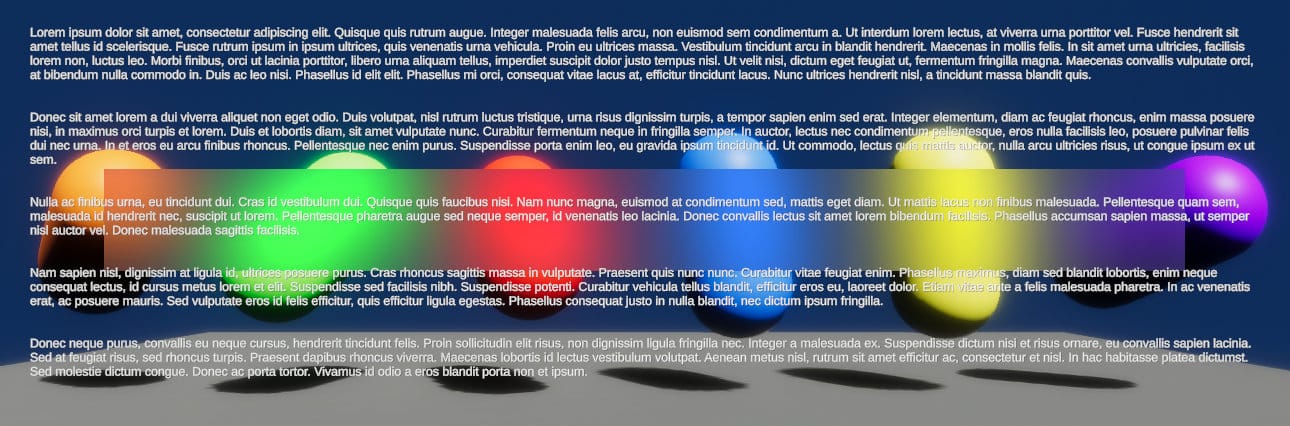
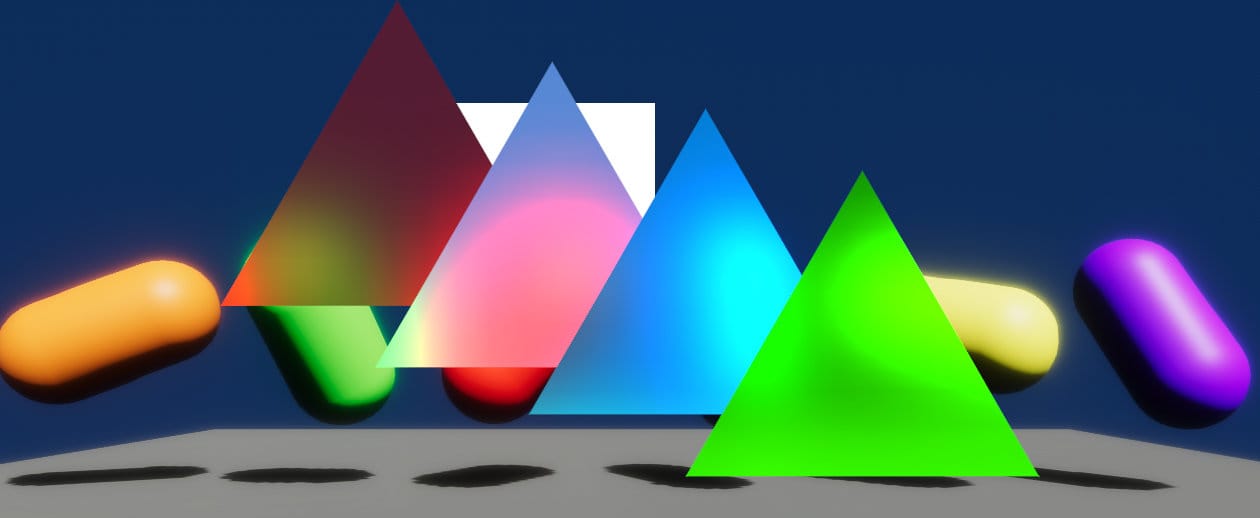
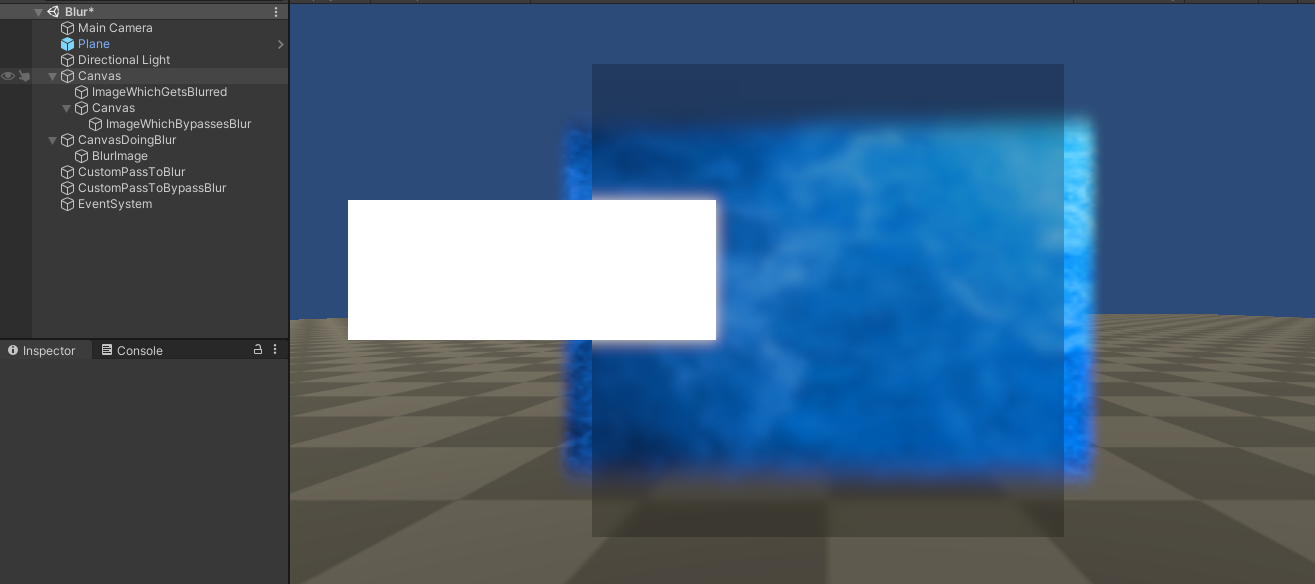
A third problem is that blur panels will not blur other panels behind them, nor will they blur other UI elements behind them with this method. Elements will sort properly, but the blur will act as if there are no other UI elements behind it, as it’s using the camera’s texture before UI is applied. In the image below, see how the panels don’t blur the panel behind them. If they were all the same color, it would look like one continuous panel, so altering the colors or alphas of the panels slightly as in the example below could alleviate that effect. The white opaque square should block the blurred image of the red capsule, but the clear triangle reveals the blurred capsule behind the white square, so keep this behavior in mind when designing your UI.
If you wanted blur panels to blur other UI elements, then you may need to look into multiple custom passes and layers of UI with various queues and rendering passes.
I received an email from Akash Darshan on how to use multiple custom passes to blur other UI layers. It was something I had not explored yet, so full credit goes to Akash for the following instructions and screenshots:
“You can achieve UI Blur as well using the same technique with 3 total layers, and 2 custom passes. Here's the result:
Lets say the material you've created from your shader graph is called BlurMat.mat.
And lets say the three layers are UI , UI_NoBlur , BlurringUI.
BlurringUI is the layer which is causing the Blur.
UI_NoBlur is the layer which will always be drawn above the blur without getting blurred.
UI is the default built in layer, which gets blurred out when using the blur.
If you don’t want to blur UI layer completely and don’t care about blurring anything else beneath it, you can always use an Image component in the UI layer itself along with the BlurMat to blur the world, and draw UI elements which are placed below it in the hierarchy.
Another thing to notice is that layers work only when applied to a canvas GameObject. So in my setup, I've used a nested canvas setup. Where UI_NoBlur layer canvas is a child of the main UI layer
So to set things up, you'll first need to remove the BlurringUI and UI_NoBlur culling masks from camera.
Set 2 custom passes. One for Blurring UI, another for UI_NoBlur.
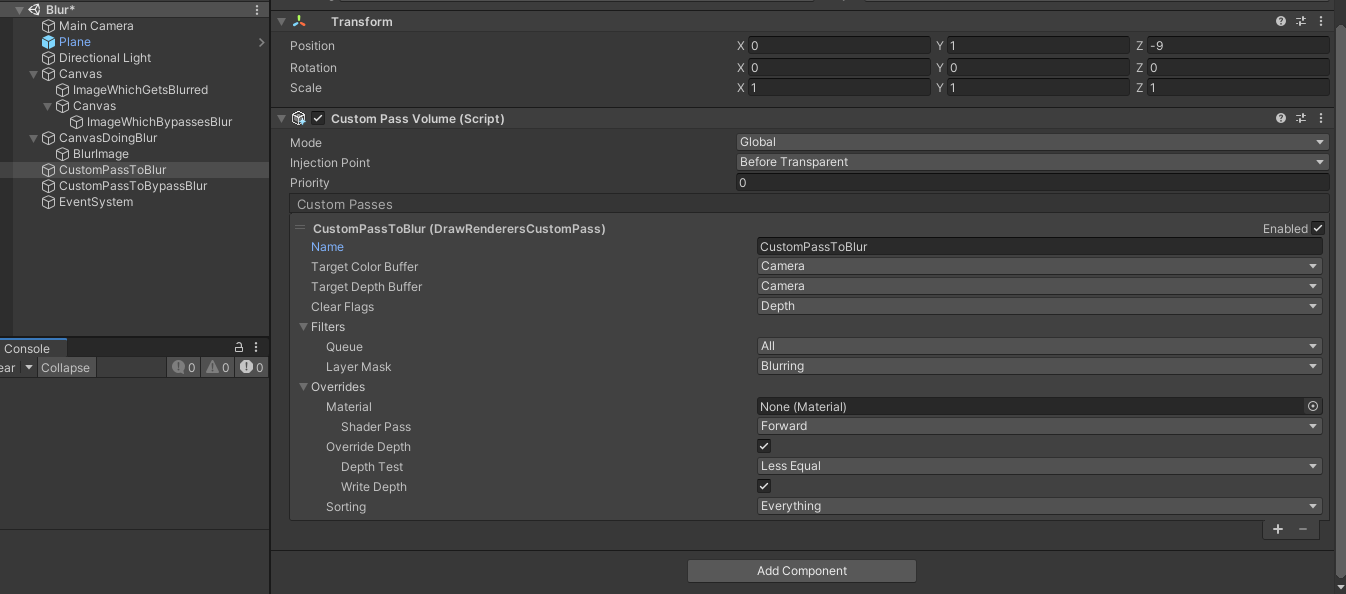
Custom Pass for BlurringUI layer :
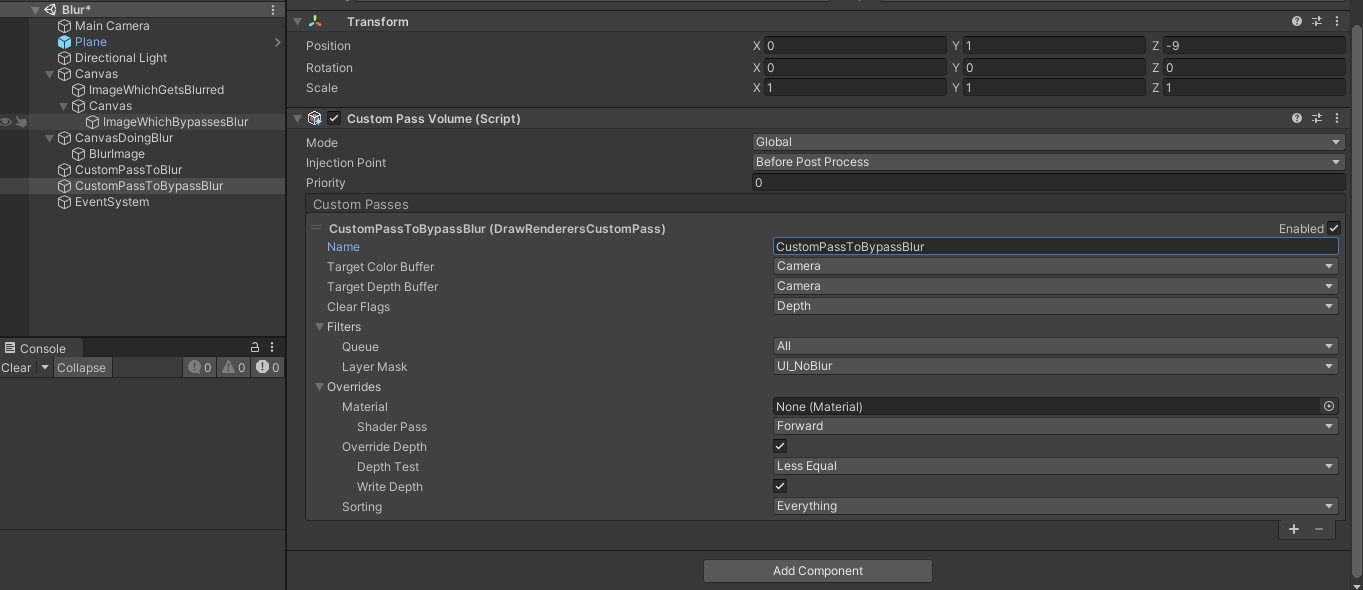
Custom Pass for UI_NoBlur layer :
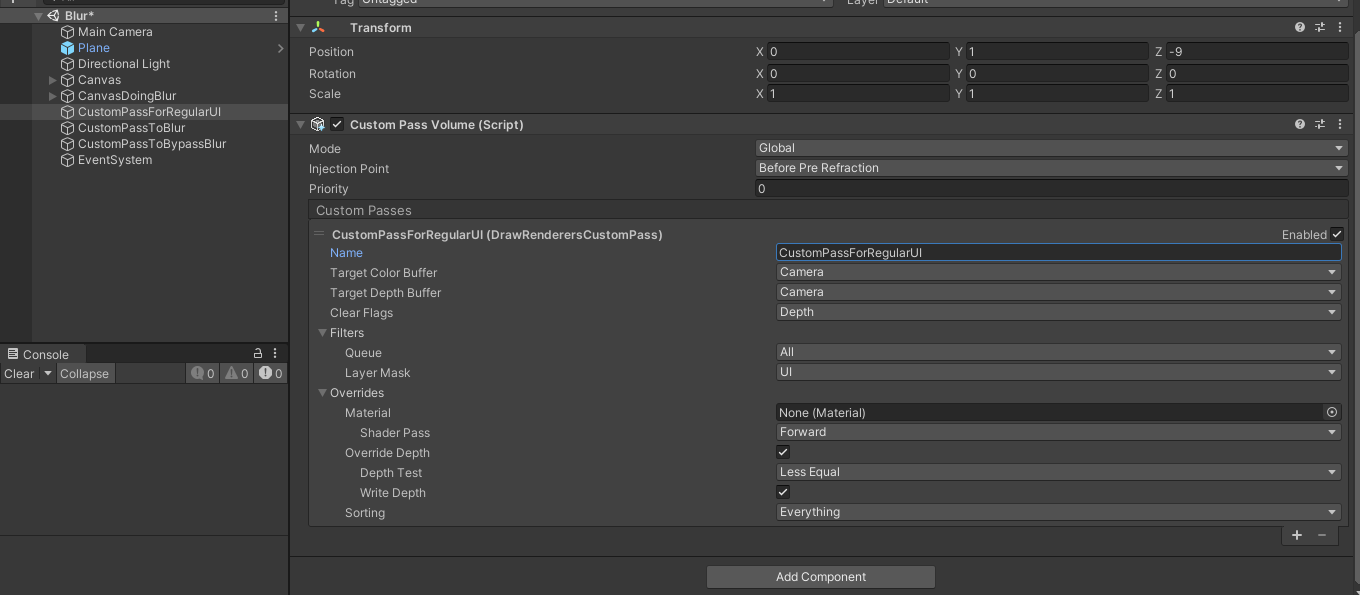
Optionally you can remove the main camera's UI culling mask, and add another custom pass to handle the RegularUI call having injection point as Before Pre Refraction when it needs to be blurred, and set to Before Post process when there's no blur so that post processing can be used aswell.
Optional custom pass for UI layer :
With these two additions and combinations of a few UI elements, I believe we can achieve the same blur level as we could with grab pass in the traditional (legacy built-in pipeline) shader, but without additional performance cost.
Again, this only works with World and Screen space camera for obvious reasons.”
* End of Akash’s instructions. Many thanks for explaining how to do this!
Method 4: Shader Graph HDRP Unlit Shader and the Graphics Compositor
This method solves the problem with Method 3’s Custom Pass not blurring the final post-processed scene, but at a significant performance cost. We’re going to use the Graphics Compositor, because HDRP doesn’t normally allow having an additional camera for the UI that’s not affected by post-processing without it.
For this method to work, follow Method 3 up until the Custom Pass section, but don’t use the Custom Pass. Instead, we’re going to do the following:
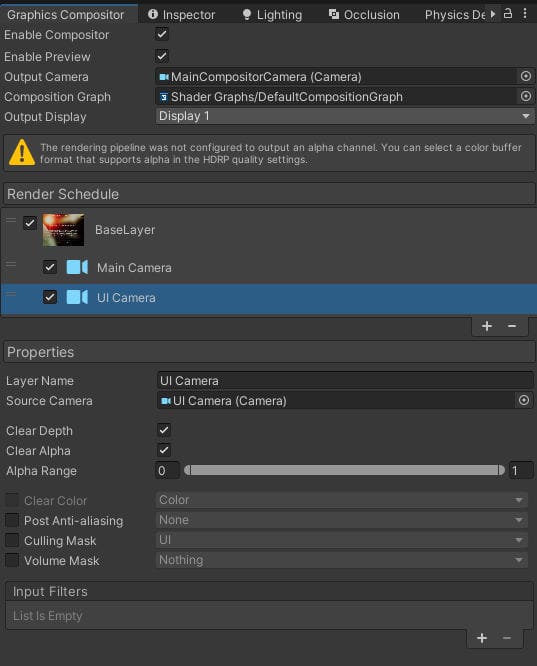
Ensure to remove the UI layer from the culling mask of your Main Camera. Create a second camera (let’s name it UI Camera) whose culling mask is set only to the UI. Ensure that this UI Camera is not affected by any Post Process Volume layers by setting the Volume Layer Mask for this camera to Nothing. In your Screen Space Camera UI canvas, set this UI Camera as the Render Camera.
Open Window > Render Pipeline > Graphics Compositor. Click the checkmark to Enable Compositor. You will immediately get a new camera in the hierarchy called “MainCompositorCamera”. This is the camera that your Main Camera and UI Camera will output into. In the Graphics Compositor, add a Camera Sub-Layer to the Base Layer, but underneath the Main Camera Sub-Layer. You can rename them both if you wish. Set the UI Camera as the Source Camera for the UI Camera Sub-Layer (see the image above). That’s it.
With the Shader Graph blur method from Method 3 on an Image component, we will get blurring on a UI that is not affected by post-processing, and which blurs the final post-processed output of the Main Camera. We still get the problem of not being able to blur other UI elements that Method 3 sort of solves with the Custom Pass.
So, the main drawback to this Graphics Compositor method is the cost. At 2560x1440, I’m getting roughly a 2ms cost on the CPU, and a 1.5 ms cost on the GPU. According to the HDRP Docs, “The Graphics Compositor has a rather high CPU and GPU overhead and it is not recommended to be used in performance critical applications such as video games”. If we enable Custom Frame Settings on the UI Camera, and remove most options (Opaque Objects has the highest cost and isn’t needed), and just keep things like Transparent Objects, Distortion, Rough Distortion, and Custom Pass, we can gain a little performance to around 1 ms on the GPU, although the CPU cost remains. You can also change the format for the BaseLayer to R11G11B10 to save a few more resources, if that is already your color buffer format in the HDRP settings and for post processing.
One interesting thing about the Compositor is that we can use MSAA only for the UI Camera if we wish, by enabling it on its frame settings. If we don’t want it on the Main Camera, we can disable it in its frame settings. You’ll need to set the Multisample Anti-aliasing Quality in your HDRP settings asset to see it though. This can be useful if we’re using meshes from the Unity UI Extensions, or if using SVGs using Unity’s experimental Vector Graphics package.
So all in all, while this solves most issues, it is best used if you have a lot of frame time to spare, which may not be the case in games.
Method 5: Custom Pass Gaussian Blur with a Custom Pass for UI
This method involved a lot of fiddling, and I’m still not sure I’m doing it right, but it works with less of a performance hit than Method 4 with some additional issues. This uses a Custom Pass Gaussian Blur, and then the Custom Pass for the Screen Space Camera UI like in the Custom Pass section of Method 3. There are a few things we need to do to get this method to work.
First, have your UI in Screen Space Camera mode, with the render camera for the UI being the Main Camera. The UI should not be in the culling mask for the camera.
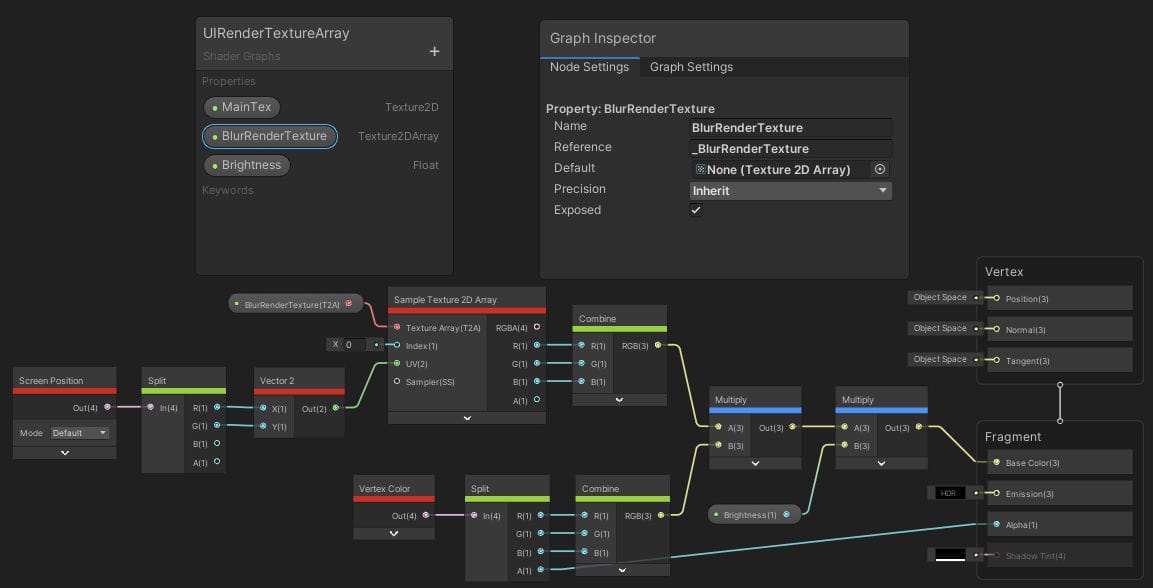
Second, create an HDRP Unlit Shader Graph shader. It needs a MainTex Texture 2D property with the reference name _MainTex, in order to work as a UI shader without errors. Then it should have a Texture2DArray property called whatever you want (I used BlurRenderTexture) with a reference name you should enter and note down for when we pass the render texture into a material that uses this shader. Then create a material using this shader and set it to a UI Image component. The shader can look something like this:
Next, we need to create the Custom Pass. In your Project tab, create a Rendering > C# Custom Pass. I used a modified version of the Custom Pass Utils API Gaussian Blur found here. I added controls in the Custom Pass inspector to play with the blur. Note that the sampleCount property can greatly increase the cost of this effect. The greater the radius, the more you’ll need to up the sampleCount to make the blur smoother without artifacts. Here’s what I came up with:
using UnityEngine;
using UnityEngine.Rendering;
using UnityEngine.Rendering.HighDefinition;
using UnityEngine.Experimental.Rendering;

class FullScreenBlur : CustomPass
{
    public float radius = 8.0f; // Specifies the radius for the blur in pixels.
    public int sampleCount = 9; // Specifies the precision of the blur. This also affects the resource intensity of the blur. A value of 9 is good for real-time applications.
    public RenderTexture renderTexture; // We'll need to access this from another script to set on the UI material.

    private RTHandle halfResTarget;
    private RTHandle extraBuffer;

    // It can be used to configure render targets and their clear state. Also to create temporary render target textures.
    // When empty this render pass will render to the active camera render target.
    // You should never call CommandBuffer.SetRenderTarget. Instead call <c>ConfigureTarget</c> and <c>ConfigureClear</c>.
    // The render pipeline will ensure target setup and clearing happens in an performance manner.
    protected override void Setup(ScriptableRenderContext renderContext, CommandBuffer cmd)
    {
        halfResTarget = RTHandles.Alloc(

            Vector2.one * 0.5f, // Note the * 0.5f here. This allocates a half-resolution target, which saves a lot of memory.
            TextureXR.slices,
            dimension: TextureXR.dimension,
            colorFormat: GraphicsFormat.B10G11R11_UFloatPack32, // Since alpha is unnecessary for Gaussian blur, this effect uses an HDR texture format with no alpha channel.
            useDynamicScale: true,
            name: "Half Res Custom Pass"    // When creating textures, be sure to name them as it is useful for debugging.
        );

        extraBuffer = RTHandles.Alloc(
            Vector2.one * 0.5f,
            TextureXR.slices,
            dimension: TextureXR.dimension,
            colorFormat: GraphicsFormat.B10G11R11_UFloatPack32,
            useDynamicScale: true,
            name: "Extra Buffer"
        );

        // This needs to happen before we try to access the RenderTexture, otherwise it will be null.
        renderTexture = extraBuffer.rt;
    }

    // Executed every frame for all the camera inside the pass volume.
    // The context contains the command buffer to use to enqueue graphics commands.
    protected override void Execute(CustomPassContext ctx)
    {
        // The radius property keeps hovering around some low value on the Custom Pass unless we use a copy of it.
        float tempRadius = radius;
        // In cases where you have multiple cameras with different resolutions, this makes the blur coherent across these cameras.
        tempRadius *= ctx.cameraColorBuffer.rtHandleProperties.rtHandleScale.x;

        //int halfScreenWidth = Screen.width / 2;
        //int halfScreenHeight = Screen.height / 2;

        //if (extraBuffer.rt.width != halfScreenWidth || extraBuffer.rt.height != halfScreenHeight)
        //{
        //    //This particluar solution to the resizing issue has the problem of the previous RTHandles not being released.
        //    extraBuffer = RTHandles.Alloc(
        //        Vector2.one * 0.5f,
        //        TextureXR.slices,
        //        dimension: TextureXR.dimension,
        //        colorFormat: GraphicsFormat.B10G11R11_UFloatPack32,
        //        useDynamicScale: true,
        //        name: "Extra Buffer"
        //    );


        //    // This particular solution has some issues with the blurred image still not being in the correct location when the Game View changes resolution.
        //    //extraBuffer.rtHandleProperties.currentRenderTargetSize.Set(halfScreenWidth, halfScreenHeight);
        //    //extraBuffer.rtHandleProperties.currentViewportSize.Set(halfScreenWidth, halfScreenHeight);
        //}

        CustomPassUtils.GaussianBlur(ctx, ctx.cameraColorBuffer, extraBuffer, halfResTarget, sampleCount, tempRadius, downSample: true);
    }

    // Cleanup code
    protected override void Cleanup()
    {
        halfResTarget.Release();
        extraBuffer.Release();
    }
}
For the CustomPassUtils.GaussianBlur, if we use ctx.cameraColorBuffer as the destination instead of extraBuffer, it will output the blur to the whole screen. You can set it to that to see how the blur looks, then change it back.
We get an error if we use the halfResTarget as the destination, so I needed to create another extraBuffer to be the downsampled destination, and then set the renderTexture to that. There is some resizing code of the RTHandle that I added which is commented out. This is because if you resize the Game View at runtime, you get some weird issues with the blur not matching the Game View resolution. Also in the Unity editor, if you maximize the Game View on play, and then unmaximize it, you get similar problems. I tried releasing the RTHandle and allocating a new extraBuffer RTHandle in the Execute method when the screen size changes, which solved some problems but had a bunch of errors about the previous RTHandles not being released. I then tried resizing the RTHandleProperties of the extraBuffer, which helps somewhat, but still has other problems. With my current coding skills, I couldn’t figure it out, so if you come across a solution for this, please let me know. Update: See the comments at the bottom of this whole post to see a solution to this problem that Andrea Jörgensen contributed. I haven’t tested it out yet, though, but when I do, I’ll update this post.
Create a Custom Pass Volume, and add this FullScreenBlur as the first custom pass. Next, add a DrawRenderersCustomPass whose Layer Mask is set to the UI (similar to the Custom Pass in Method 3). It should look something like the following:
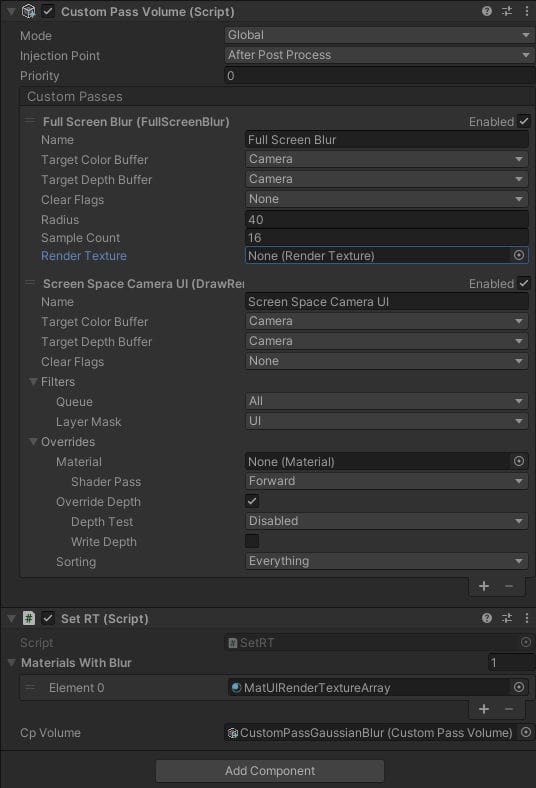
Third, we need to create that SetRT (Set Render Texture) script which gets the CustomPassVolume, accesses the FullScreenBlur for its renderTexture, then assigns it to the Texture2DArray property of the UI material we created earlier. Here’s a barebones script I came up with, but feel free to do your own:
using System.Collections.Generic;
using UnityEngine;
using UnityEngine.Rendering.HighDefinition;

public class SetRT : MonoBehaviour
{
    [SerializeField] private List<Material> materialsWithBlur = new List<Material>();
    [SerializeField] private CustomPassVolume cpVolume = default;


    private FullScreenBlur fullScreenBlur;


    private void Start()
    {
        List<CustomPass> customPasses = cpVolume.customPasses;
        fullScreenBlur = customPasses[0] as FullScreenBlur;

        Invoke("SetTexture", 2);
    }


    private void SetTexture()
    {
        if (fullScreenBlur.renderTexture == null) Debug.Log("Null, so not assigned yet in the custom pass Setup function.");

        for (int i = 0; i < materialsWithBlur.Count; i++)
        {
            materialsWithBlur[i].SetTexture("_BlurRenderTexture", fullScreenBlur.renderTexture);
        }
    }
}
Note the Invoke call which I set for happening after 2 seconds. You can change this obviously, but it’s to ensure that accessing the fullScreenBlur.renderTexture before the Setup method is called at runtime in the Custom Pass doesn’t result in a null reference exception. I added a list of materials for the inspector for UI materials, so make sure to add your UI material that we created earlier to this list.
With the settings I used in the previous screenshot of the Custom Pass Volume, after you hit Play and wait for 2 seconds, you should get a blurred UI. Depending on your video card and screen resolution, the cost for this method can be roughly 0.3 ms on the GPU with minimal cost on the CPU. If you increase the blur radius, you’ll need to increase the sampleCount to compensate to achieve a smooth blur without artifacts, and then the cost of the blur can potentially jump to roughly 1 ms on the GPU. Check the cost in the profiler by adding a GPU Usage module in the profiler, clicking Live on it, then entering the name of the Custom Pass you chose in the inspector for the blur into the search field.
The performance of this method seems to be better than Method 4, which is nice, as long as we can solve the resizing problem.
Conclusion
So there we have it, 5 different methods for achieving blurred UI in Unity’s HDRP, each with their own issues. This took a lot of time to put together, so I’m hoping this is useful for someone out there. The funny thing is that after all this, I’m not even going to use blurred UI in my game, mainly because of the performance hit, but also due to needing to add a drop shadow/underlay to UI text and graphic elements to get them to appear legibly and cleanly over the blurred panels. The knowledge gained was worth it at least. All the best to you on your game dev endeavors!
Comments
The comments shown below are from visitors when I was using Squarespace for website hosting, but I've switched to cheaper hosting with a different CMS and currently have registering/commenting disabled. Since this post tends to get a lot of traffic, I've copy/pasted all past comments in case they may be useful for someone.
ExtremeCheddar 2023
Thanks for this guide! Using Screen Space - Camera in Method 2 makes the UI Elements clip into world objects. This can be avoided if the Depth Test is disabled on the material. That allows you to set a much larger plane distance in the canvas, which also resolves the problem with depth of field. Just set the plane distance to the value of your focus distance and there will be no blur. That way you can have tone mapping applied to the UI and it still remains sharp
Sean Kumar 2023
Thank you for posting the problem and solution. I'll add your comment to the blog post for better visibility.
OskarZyg 2021
So the only Screen Space Overlay method is paid?
Sean Kumar 2021
Well, if one has the ability to write a UI shader which takes a render texture and blurs it, like that asset developer did, then no, it doesn't need to be paid. I currently don't have that level of knowledge. I've also noticed that many of the most purchased UI blur options on the Asset Store only support built-in and URP, which probably means either the demand isn't high, it's too much effort, or it's very difficult to achieve a performant UI blur in HDRP currently, especially in Screen Space Overlay. Hopefully that will change in the future.
Andrea Jörgensen 2021
I found a fix for the viewport scaling issue you're having - you need to pass the RTHandleScale from your RTHandle into the shader, and use that to scale the UV - see this Unity docs article.
Just pass it in and multiply your screen space UVs with it.
Sean Kumar 2021
Thank you! I'll be attempting this soon. Meanwhile, I've updated the post to mention your solution.
Axon 2021
THANKS, YOU SAVED MY LIFE!
Sean Kumar 2021
Oh wow, that's unexpected! I didn't think blur could save someone's life! Thank you!
D 2021
thank you!
Sean Kumar 2021
Thanks for commenting!
drfdr 2021
Method3 Doesn't work it's just purple..
Sean Kumar 2021
Hi, can you give a little more detail as to which part specifically gives a purple material? I just tried in a brand new fresh Unity 2020.1f12 project, with both HDRP versions 8 and 9, and I was able to get Method 3 to work following the instructions. Having said that, I've added a few more details in the blog post that could possibly help.
guest 2021
Nice! Thanks!
Sean Kumar 2021
Thanks for stopping by!